Monday, July 29, 2013

Removing the Bumper on a 1975 Datsun 620

I was removing the fender from my truck and I got stuck. I had to remove the bumper first before removing the fender. So I looked all around the truck and was not able to find where the bumper was anchored. I ended up finding four bolts, two on the driver and two on the passenger side.

The two missing bolts are the ones that I removed. Here you see the radiator hose going into the radiator. Just look down, they are right there. Remove all four and the bumper comes out. Oh, and don't  forget the bolt attached to the fender on each side. These should be in there but might not be necessary to have.

Look at the bumper on the driver side. It has a small hole, this is where the bolt goes in that attaches to the fenders.


Monday, July 22, 2013

1975 Datsun 620 PCV valve

I have recently installed the pcv valve on my 1975 Datsun 620 truck, and I can say I was a bit confused. I thought the pcv valve (for some reason) was located right on top of the valve cover of my engine (L20B). I tried to remove it and found out it was an empty tube. I was shocked. I did a little bit of research online and found out that this thing is located below the carburator. Please take a look at the picture below. It is pointing to the PCV valve which has a rubber hose attached to it fastened with a clamp. It is hidden.


I removed the hose and exposed the valve. You can see me turning the PCV valve with a wrench here:


I bought it at Autozone, and the part number is PCV1142


Thursday, July 18, 2013

My dirty spark plugs

I just wanted to show you guys the dirty spark plugs that I pulled out of my Datsun 620. Please enjoy!


I ended up replacing them with NGK Copper V Power.

Datsun 620 fuel filter problem

So I just got my 1975 Datsun and have put fuel in it twice. The first time I put in $10 from the gas station down the street, turned the truck on, and drove home. The second time I put $20 from the Chevron across town, turn it on, the truck shut off on my way home, turned it back on and struggled to get home driving. I finally made it. I looked under my hood and I have no fuel filter! I won't drive it anymore until this is fixed.

Also, my engine will not stay on unless I keep pressing the gas pedal, so there must be something clogging my carburetor.

This picture is from a forum but shows the location of the fuel filter, right there by the corner of the battery.


Mine has a piece of tube which I don't think does that great of a job (See picture below).


Here is a picture of the fuel system I found online:
This is how my system looks installed:
The filter is attached to the inlet of the mechanical fuel pump as shown. Please do not make the same mistake I did and think the fuel pump was inside the tank. The thing shown here is the mechanical fuel pump. It is mechanical, not electrical.

This is a closer look:
The part number is FF3402DL and I found it at Autozone 

Use hoses that are 1/4 inch in diameter (inner diameter), I accidentally bought 5/16 and was too loose. 1/4 is perfect.

Also look at this previous picture (the one with the filter). Please somebody tell me if you have managed to have the transparent tank more than halfways full. I expected it to be full but I either get 1/4 of the transparent tank or 1/2, but never full. Is this normal?

This is the filter while empty.

Also I learned about a pre-filter system or pre filter. I found one at Autozone but they call it "performance" fuel filter. its just a fuel filter in their performance isle which you can remove the inside filter. When I buy it I'll post it here.

Also, note that I was expecting the fuel pressure to shoot fuel out of the lines when disconnecting them. This did not happen. The mechanical pump sucks fuel from the tank, and does not push it. There is not pressure accumulated in the line where the filter is attached to. Please slap me for that. Just disconect the lines, don't be afraid

By the way, I fixed my problem. Im sure it was the fuel filter, but while I was at it, I ended up replacing the plugs, oil and oil filter, and even adding an additive to the fuel (Mystery Oil). Oh, and I broke my breather hose. I need a new one.

How to change the Breather filter on a 1975 Datsun 620

This post is about how I changed the Breather filter on my Datsun. If you have any questions please let me know. This is also the first thing I've documented on my truck.


I replaced the filter or sponge that captures the oil that leaves the valve cover going into the air filter tray. I bought it at Autozone and had to cut a small piece so it would fit:
 The part number on it is BF1209DL.
Here you can see the old sponge filter full of old oil. Also, you can see the leftover piece of sponge, and the new one installed. The new sponge is more fat, so I had to stuff it in the small compartment gently using my scissors.

I originally made the mistake of calling the metal tube coming out of the valve cover a "PCV valve". Please note that this is incorrect. It is the "Breather Tube". I have read that you can just attach a small filter at the end to fix it if you ever brake it. Please read this on the Ratsun forums:
http://community.ratsun.net/topic/43794-help-with-an-l20b-breather-question/

Wednesday, July 17, 2013

What do I need to know before painting my car?

Update: 04/230/2016

Do not spend too much time on this. The outcome will be as good as the painter. take your vehicle to a shop and be ready to spend some good money on a paint job.


I spent about $70 on about 12 cans of Lowes Valspar spray paint cans. the paint looks better than the old one, but it is not shiny at all. it took me about 3 weeks to "prep it". I would paint it again if I knew it was going to look better. I only sanded what I thought needed to be roughened for paint, and I only masked everything that I needed to protect from paint. I removed as many parts as I could for paint preparation as well. In my opinion, and considering the limited paint skills that I have, do not put too much time and effort in prepping the vehicle if you are using the same type of paint that I did. It did not come out the way I wanted it to come out and I was disappointed considering the time and effort that it took me to paint it. in the future if I consider to go this route, I wouldn't prep it so much if I would be painting it. the following is what I had written before painting the vehicle.


I am currently dealing with this. I want to paint my Datsun 620 but have a hard time deciding.
First, I don't want to spend a lot of money doing it myself since I don't have the equipment to do it professionally, therefore I want to spray paint it with cans.
Second, the color. I have not decided on the color yet.
Third, the body has not been properly prepared, so I kind of would like to prime the vehicle and drive it like that for a few months and fix the dents little by litte.

I just went to Wal-Mart and found some cool looking paint for a low price. I have no idea how much paint am I going to need. I want to paint it mint green with white or brown. Or mint green with black. Or any combination with those. The guy at walmart told me that this enamel paint would not come off the truck that easily. I dont know.

Here is a useful link so far:
http://www.doityourself.com/stry/pros-and-cons-of-using-enamel-car-paint#b

And kidharris at http://www.instructables.com/id/Paint-Your-Car-With-Rustoleum/
"This is in response to a number of comments scattered throughout these pages. Although I am not a professional painter, do not work in a paint store, and have never painted a car with Rustoleum, I have painted a few cars in my 60 years and have developed a few opinions on the subject. 

It's been my experience that fisheye's are caused by not completely removing all the wax off the old paint job, particularly if there was any silicone-based wax on the old paint. The wax must be removed with a solvent/cleaner/wax remover, sanding will just spread it around. If you know that you are going to be painting the car sometime in the future, stop waxing it and allow the old wax to wear off as much as possible and then there will be less to clean off. 

In addition orange peel is caused by too much humidity in the air, or water in the paint, and can be alleviated to some extent by controlling the drying time using more thinner and/or painting on low humidity days or in a humidity controlled environment. I once (when I was young) painted a van under a awning while it is was pouring rain, you should have seen the finish on that. 

I am not a big fan of clear coats. Most professional auto painters love clear coats because they do not have to be buffed and polished which saves them a lot of time and therefore they make more money. Paint stores love clearcoat because they get to sell more product. It is crucial in using clear coats that you use one that is designed for the paint. Even then most of the really crappy looking paint jobs that you see on the highway where the paint looks all wore out and patchy/chalky/faded on the top of the hood and roof is caused by the clear coat wearing away and the paint underneath not having any wax on it. Sometimes too thick of a clearcoat causes it to act like a magnifying glass and damages the paint underneath and can cause the clearcoat to peel off, especially over dark colors. This, of course, also gives the professional auto painter more work. In addition, clearcoat makes small paint repairs a real pain to do. 

Although clearcoat definitely has its place (some paints will not shine well without it, and it can add depth to special effects) I'm a little tired of people hollering clearcoat, clearcoat, clearcoat like it is the ultimate cure for all painting problems and will make your paint job last forever. It simply is not true. 


Hope this helps some of you who are contemplating painting is your car with what ever paint you use."

1975 Datsun 620 Pickup

I have recently acquired a 1975 Datsun 620 Pickup. I will be posting here everything that I am able to find that helps me fix my truck, what I consider useful, and what I find attractive out there 620 related. I will add links, etc. Please comment!  :-)

My truck:
1975 Datsun 620 Truck


1975 Datsun 620 Truck


The Ratsun Forums:
http://community.ratsun.net/

The 620 Link:
http://www.davidcmurphy.com/olddat/620tech.htm

Parts Manual:
http://www.carpartsmanual.com/datsun620/Datsun620Index.aspx

Some inspiration taken from these:

And I would like to use this as "white canvas" for colors considerations:


Color selection:
http://www.colorexplorer.com/colorpicker.aspx


These are some webpages that I would like to save for the future, since they could come in handy:
Headlight relay modification
Carburetor Information
How to connect a Carburator 1
Head bolts to get:
Part Number 11056-p7600 short bolt, 
11059-p7600 long bolt 
@ Nissan site
The 620
Head Bolt Torque Sequence:


FRONT

ENGINE


7...8

3...4

1...2
5...6
9..10


First torque to 20 ft lbs, Second torque to 40 ft lbs, final torque to 60 ft lbs.


Replacing the Driveshaft Carrier Bearing:
According to a source online:
"The driveline carrier brg can be replaced without special tools. It only looks hard. In the worst case, you might need an impact wrench to remove the companion flange nut, and a std gear/jaw puller to pull the flange off the driveshaft, but the last one I did did not require either of those. You willneed the correct size socket for the companion flange nut. I don't recall its size; probably 27mm or 30mm, but that's only a guess. 
Torque down bolts (center flange bolts and rear flange bolts) on driveshaft to 17-24 lb-ft.
Torque down carrier bearing bracket down to 12-16 lb-ft.

A direct fit for a water pump bolt set is available from the Z store as part number 14-1256.

Torque down driveshaft nut to 145-174 ft-lb

Wednesday, July 10, 2013

1990 Honda Accord OBD 1 Connector

I recently started looking for the OBD 1 connector for a 1990 Honda Accord. I watched a couple of videos online and they all showed the female connector. I found a male connector. I looked for it on the Honda, and being this my first time working on something like this, I doubted this was the connector I was looking for.

This is the connector:

I saw it and continued looking for a female connector. I went online and saw the same one, went back to the car and stuck a soft piece of jumper wire from my breadboard in it to close the circuit. I failed. It was too soft. I continued doing this but had no luck. I stuck my house key into the connector and this worked. Turned the key and the light gave me a number 43 code.

I hope this helps someone out there.

Arduino Thermometer using an LM35

Hi, I have recently created a thermometer using my Shrimp (Arduino) and an LM35 chip. I don't have a diagram of the connections but I am planning on making one and posting it here.

I will provide the code here and pictures of the system.

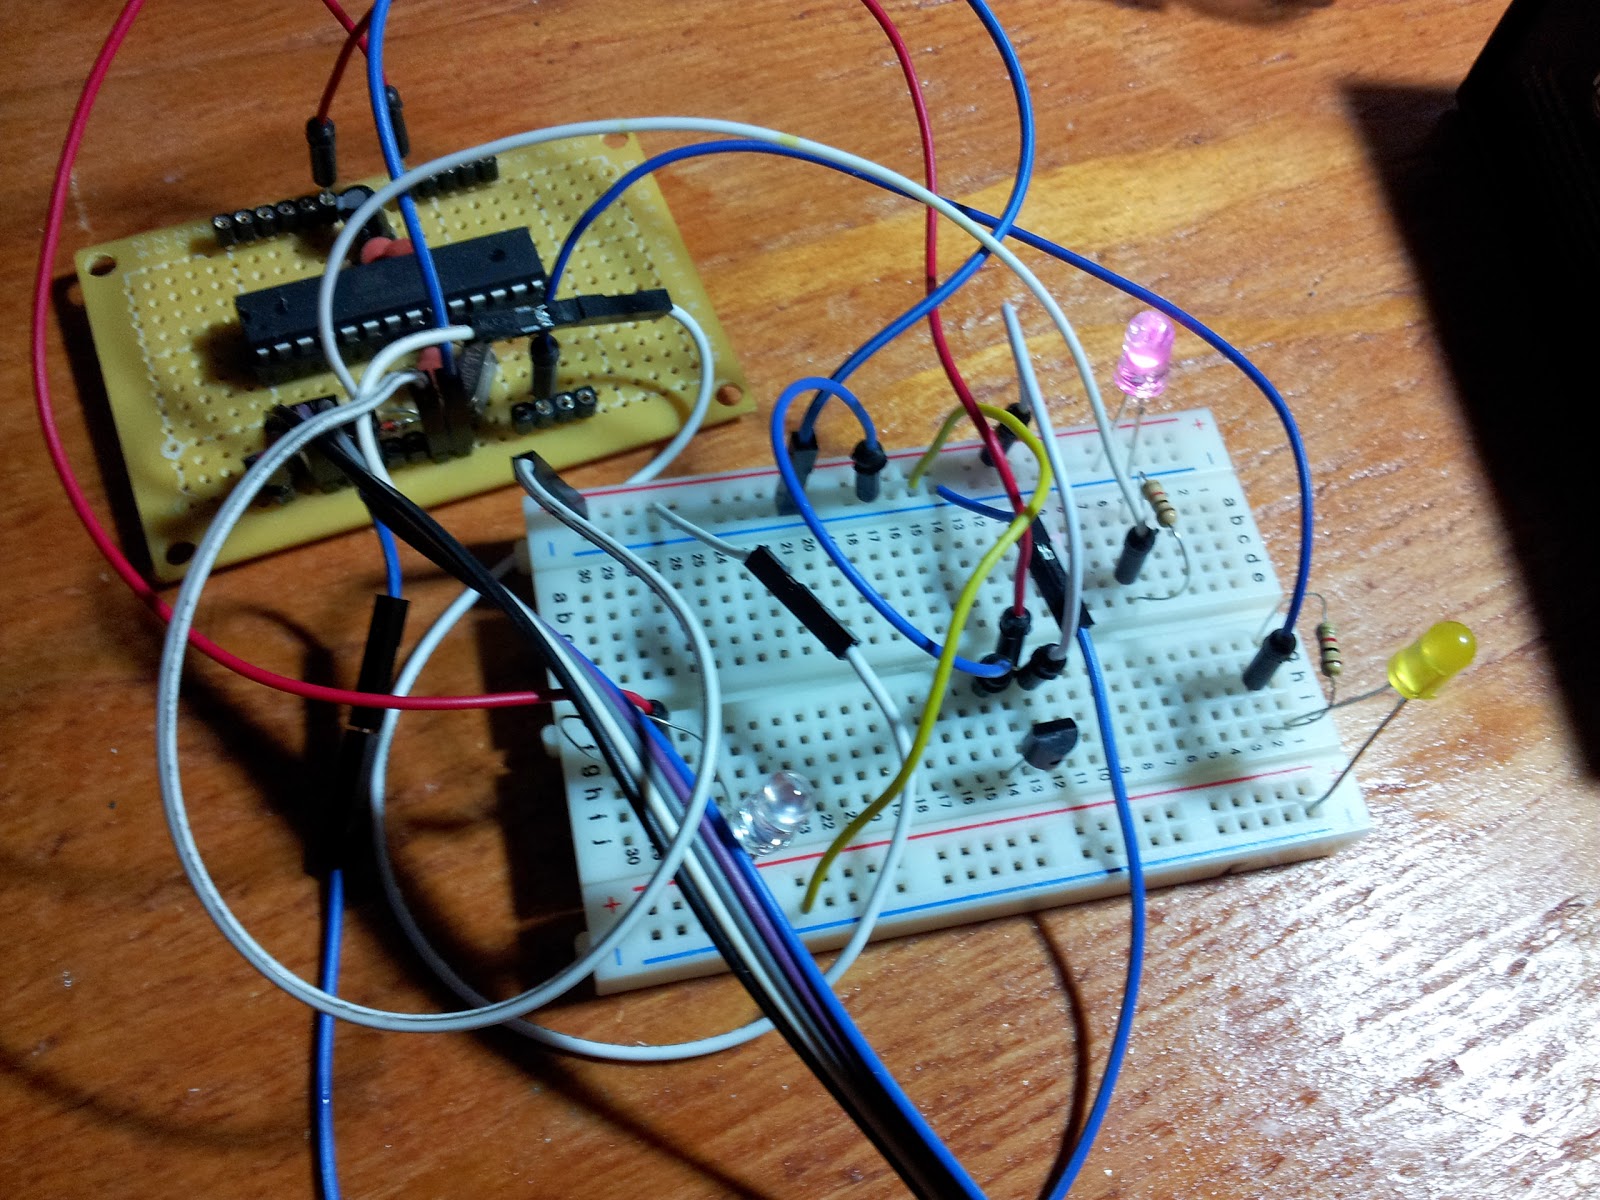
The only components used here besides my Shrimp (Arduino) are:

  • Pink LED
  • Yellow LED
  • LM35 chip
  • 2 resistors of unknown values

I connected the LED's without a resistor and worked fine. They were brighter, but I decided to put something to prevent them from burning out.

My code is the following:


//declare variables
float tempC;
int tempPin = 0;                                      // Where 0 is an analog input
int tempF;

int blueled = 2; //the pink led is connected to digital pin 2
int yellowled = 6; //the yellow led is connected to digital pin 6

int A = 0; // I use A to keep a value stored for the outside temperature in small numbers. At first it is zero
int C = 0; // C also helps defining what the position in the ones is. I will provide example

void setup()
{
Serial.begin(9600);                                //opens serial port, sets data rate to 9600 bps

pinMode(blueled, OUTPUT);
pinMode(yellowled, OUTPUT);

}

void loop()
{
tempC = analogRead(tempPin);           //read the value from the sensor
tempC = (5.0 * tempC * 100.0)/1024.0;  //convert the analog data to temperature
tempF = (tempC*1.8)+32;  //convert celcius to farenheit
Serial.println((byte)tempF);      //send the data to the computer

A = tempF/10;
C = tempF-(A*10);

delay(1000);
for (int i=0; i<(A); i ++)
{
digitalWrite(blueled, HIGH);
delay(800);
digitalWrite(blueled, LOW);
delay(600);
}

for (int n=0; n<( C ); n ++)
{
digitalWrite(yellowled, HIGH);
delay(900);
digitalWrite(yellowled, LOW);
delay(600);
}
delay(5000);
}


This code is what I was able to do without much experience programming. I hope it helps somebody out there.

Why am I using A and C?
These are random variables.
Example: my current temperature is 95F.
I can divide 95 by 10 (95/10 = 9.5) but for some reason arduino thinks its 9.
Now if I multiply  9*10=90. I had my temperature reading as 95, so 95-90=5.
Now I can tell the pink LED to flash 9 times, and the yellow one to flash 5 times.

I also made a video. Its on YouTube:
http://www.youtube.com/watch?v=0R_kQ_yB8_k

The setup of the board is simple. Connect the LM35 to the same ground and power than my shrimp. The middle lead goes to a pin on my shrimp. my led's are grounded with my shrimp and each positive side goes to a pin on my shrimp through a resistor (optional?)

The way it works, as explained on the video is as follows:
For example, if the current temperature is 94 degrees Farenheit (it measures in farenheit), the pink LED will flash nine times, and the orange one will flash four.
Another example: if the current temperature is 112 degrees, the pink led will flash 11 times, and the yellow one will flash 2 times.
OR just count the pink flashes and multiply them by ten, count the yellow flashes and add them together.

Where can you use this system?
If you add a solar panel to it, and a battery, you can have an "unlimited" power supply for a small arduino or even an AtTiny if you can program one. You can set it outdoors and know the outside temperature as you sit outside enjoying the view of the cars drive by.
You can also set it by the window so you know all the time what the current temperature is. Every six seconds. I have learned how to ignore LED's indoors, I dont now about you.